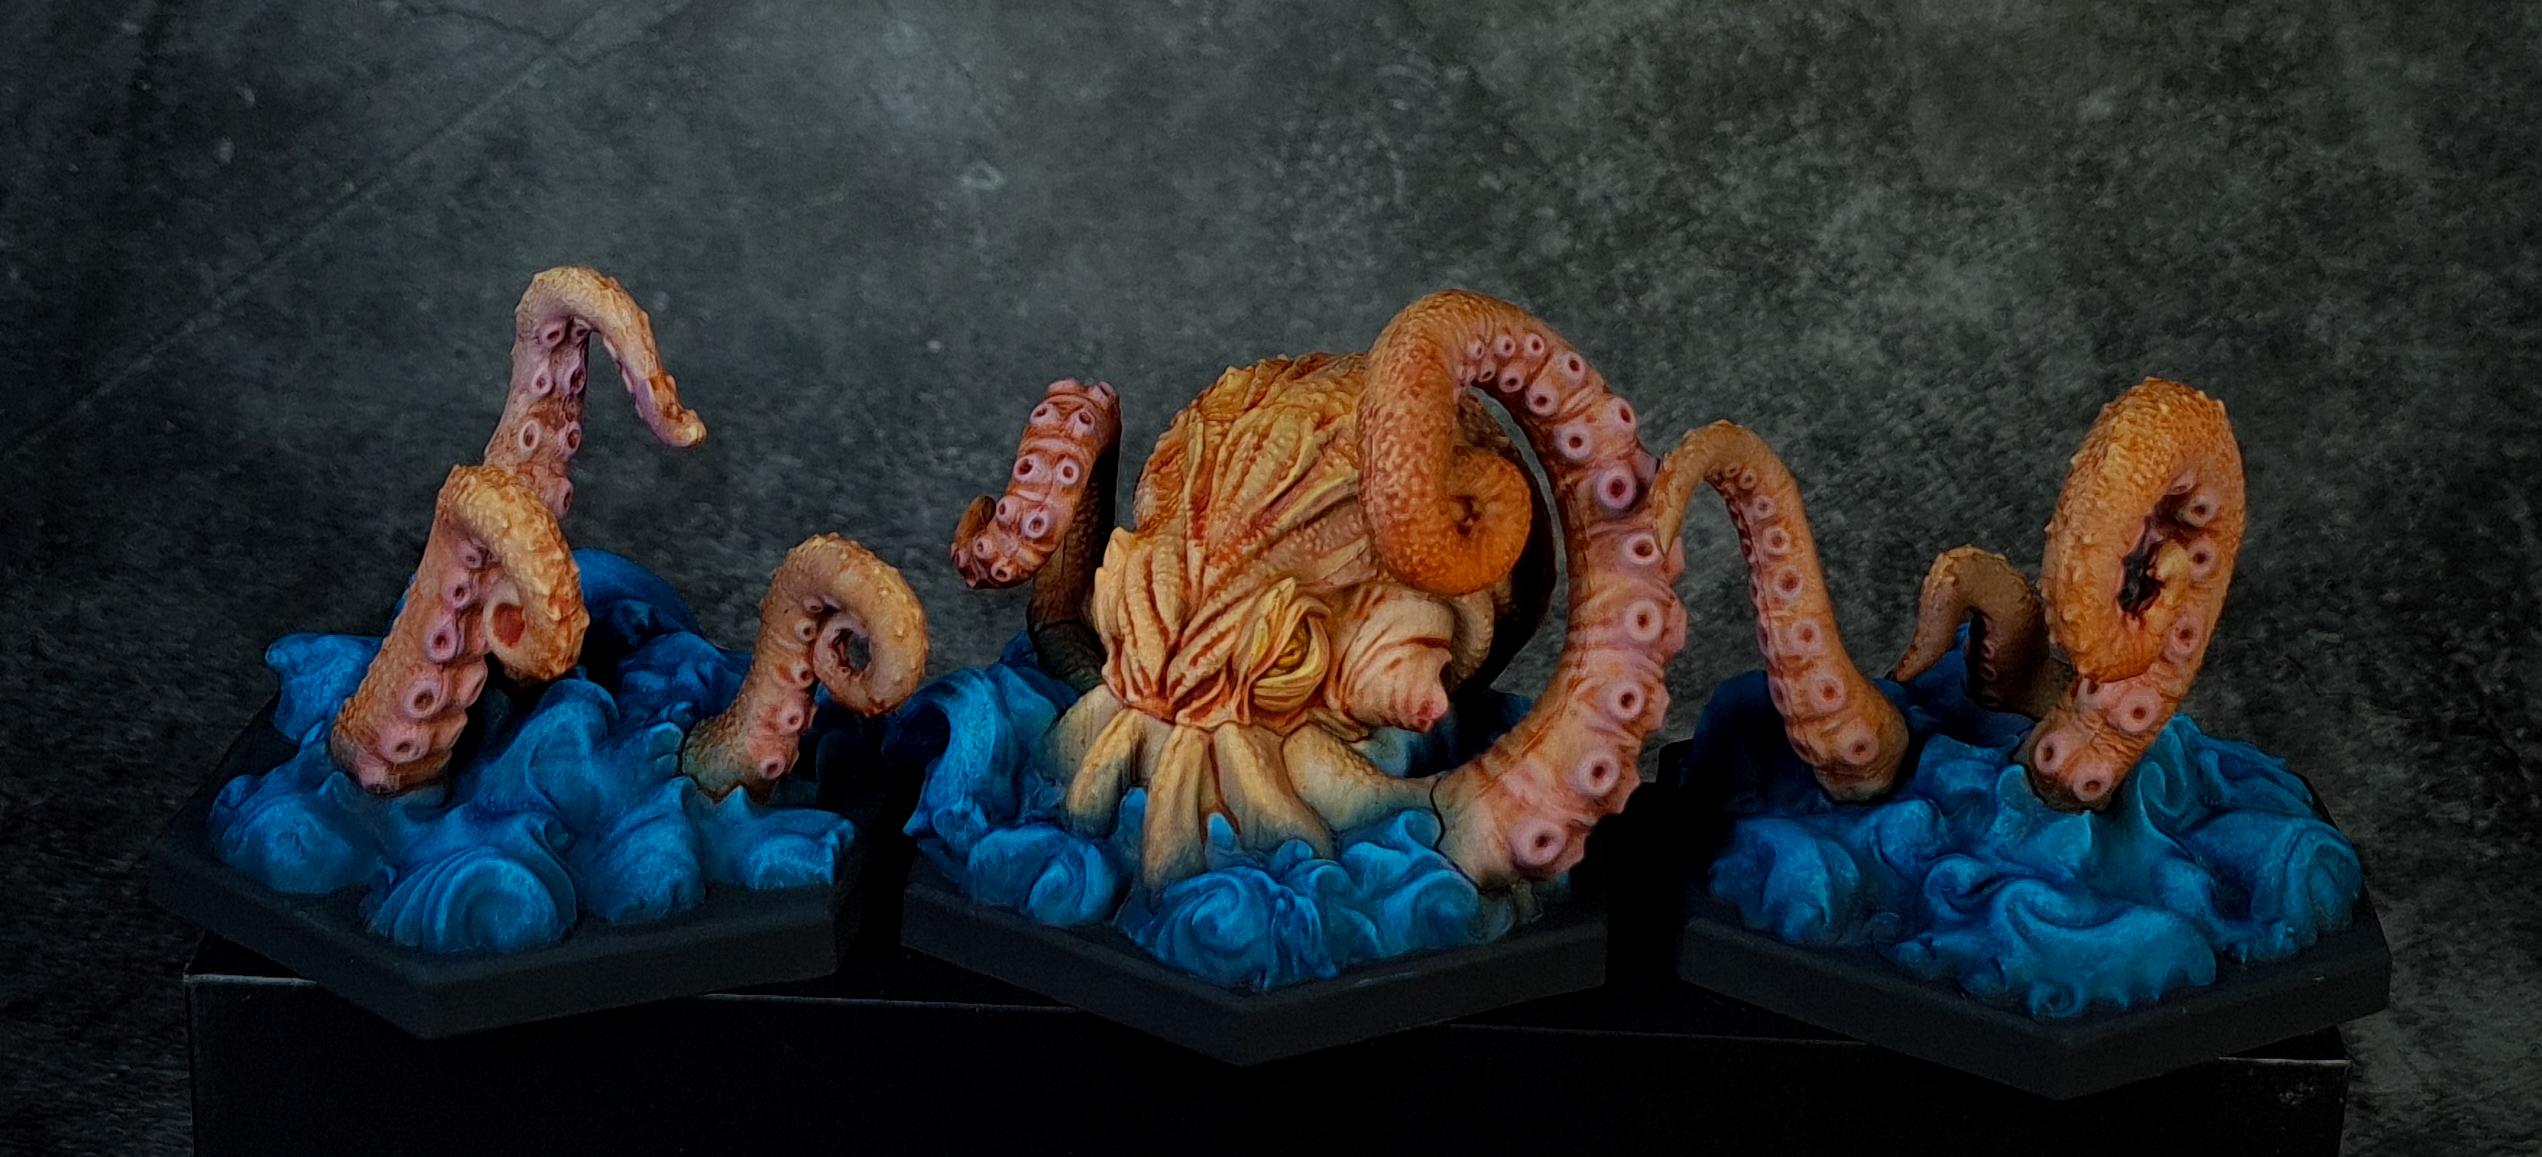
Picture by Marco Troschka
We often receive pictures of great painted miniatures. Pictures of Feed the Kraken‘s miniatures are by far the most common. Personally, I am always happy to see how much love you put into your miniatures! I can also tell you that this enthusiasm is shared by the rest of the crew.
Have courage to color!
However, I often read that some people don’t dare to give miniatures more life with a little color. This is bad for us, because we love the pictures of the finished miniatures – and also for you, because you don’t use your full creative potential! Bob Ross has always been a great role model for me, all the way into art school. Therefore, get out your happy little brushes and remember: „There are no mistakes, only happy accidents.“
Our Bob-Ross-Substitute
I had to search a bit for a Bob-Ross-Substitute for Feed the Kraken. Then one day Marco crossed my (virtual) path and I knew: this man will be able to explain to you how to paint your kraken! He shares all kinds of great painted miniatures on Instagram. Sometimes I just drop by there to be amazed. He paints miniatures as commissions. So that makes him a real professional. If you’re interested, take a look at his website.
Before we get started…
The explanations for each step and the list of ingredients come from me. So that everyone really knows what it’s all about. Each color is also linked – not to the specific product Marco mentions, but to the color that is meant. This way, the DaVincis among you can focus on the exact product and everyone else gets a rough idea of the kind of color they can use.
You will need:
- black and white primer
- a light, pinkish beige
- a dark blue
- turquoise
- grey-green
- grey-blue
- a rich, bright blue
- sky blue
- bright orange
- light violet
- light rose
- light yellow
- rich red or a red wash (= paint diluted with a glazing agent)
- a dark blue wash, if you do not dilute your dark blue with a glazing agent.
- if necessary a glazing agent, Marco uses Glaze Medium
- a colorless solvent, Marco uses White Spirit
- a dry brush
- round brushes for miniatures of your choice and preference
Now let’s start the painting! With that I hand over to Marco and his tutorial.
On to the kraken tutorial!
Since I first painted the miniatures for the Kickstarter campaign back in the day, I receive orders to paint the models every now and then and I’m still happy about it every time. Often the style is supposed to be similar to the painting I did back then and I have a nice workflow by now, which is a lot of fun and involves very uncomplicated steps:
1. Black primer– Exactly what you suspect. Take a black primer and spray the whole miniature. It doesn’t have to look particularly nice. The main thing is that it is as even as possible.
2. Set the first preshading/highlights/volume with white primer.– This sounds a bit more professional, but it’s not. You take a white primer and spray the figure lightly. Please do this after the black layer has dried! The white primer should only be on the raised points of the miniature – i.e. where the light would hit. You don’t know what is meant by this? In summer, the light shines from above onto your shoulder, not under your armpit. This works similarly for a kraken.
3. Spray skin with Pale Flesh (Scale75).– A creative name for a light, rosy beige! From this point on you don’t necessarily have to use spray paint. You can also brush happily. Spraying is just a little quicker.
4. Spray water with Dark Sea Blue (Vallejo).– This color is a dark black-blue.
5. With the dry brush I layer the color from the water (by dry brushing and dabbing). As I do this, I make sure to get more and more of the highlights and leave out the shadows. – This probably requires some explanation! Dry brushing, never heard of it? Remember those hard flat brushes from art class? Those bristly bits? That’s kind of what dry brushes look like – only much smaller, since you’re painting a miniature. When dry brushing, it is important not to have too much paint on the brush. It’s best to dab the paint off first. If you ask yourself: “Does it even paint like that?”, you have done it right.
“Dabbing” is a clever word for the process of pressing a tightly bound brush vertically onto the surface you want to paint. Again, do this with very little paint on the brush.
You already know highlights and shadows! If you are unsure, take out your desk lamp and shine it on the miniature from above. Paint the illuminated areas brighter. Leave the parts that are in shadow dark.
Colors used, from dark to light:
Turqoise(Vallejo)/Dark Sea Blue mixed 50/50
6. The skin I color with Army Painter Speedpaint (Fire Giant Orange), diluted with a little Glaze Medium. – This means you dilute orange with a glaze medium so it doesn’t completely cover.
7. When everything has dried properly, I continue with the arms and suckers. Also simply brush with a small dry brush, first Lustful Purple (Vallejo) then Old Rose (Vallejo) over the suckers and around the skin areas.– The former color is a light purple, the latter a very light shade of pink.
8. In order to reproduce the structure on the body a little more, I also brush a little over the highlight structures with the small dry brush, using the colors Pale Yellow (Vallejo) and Light Yellow (Vallejo). – Fortunately, the colors are very expressive! Here you emphasize the light incidence with a light yellow.
9. I paint the eyes again with the two yellow colors and use Marduk Yellow (Scale75) to lighten them.– You can also lighten your existing yellow with white.
10. Finally I use 2 very diluted oil colors to create more contrast. For the complete body and the tentacles I use Coagulated Blood (Abteilung502) and for the water Midnight Blue (Abteilung502). I dilute both colors with White Spirit (a colorless solvent for diluting colors) and apply the red first, let it dry and finally the blue for the water.– You can also buy these washes ready-made. I would recommend beginners to use a ready-made product in red and dark blue. Marco makes his own wash here by diluting paint with a glazing agent.
11. When the washes are dry, I use a sponge and White Spirit (a solvent) to take some of the oil paint away from the water highlights to make them appear even lighter. – This step is also something for the more advanced. You use a solvent to lighten some parts. But I’m sure your miniature will look great, even if you skip this.
12. At the end I spray everything with Matt Varnish.– This is a matt varnish that makes the colors durable and long-lasting.
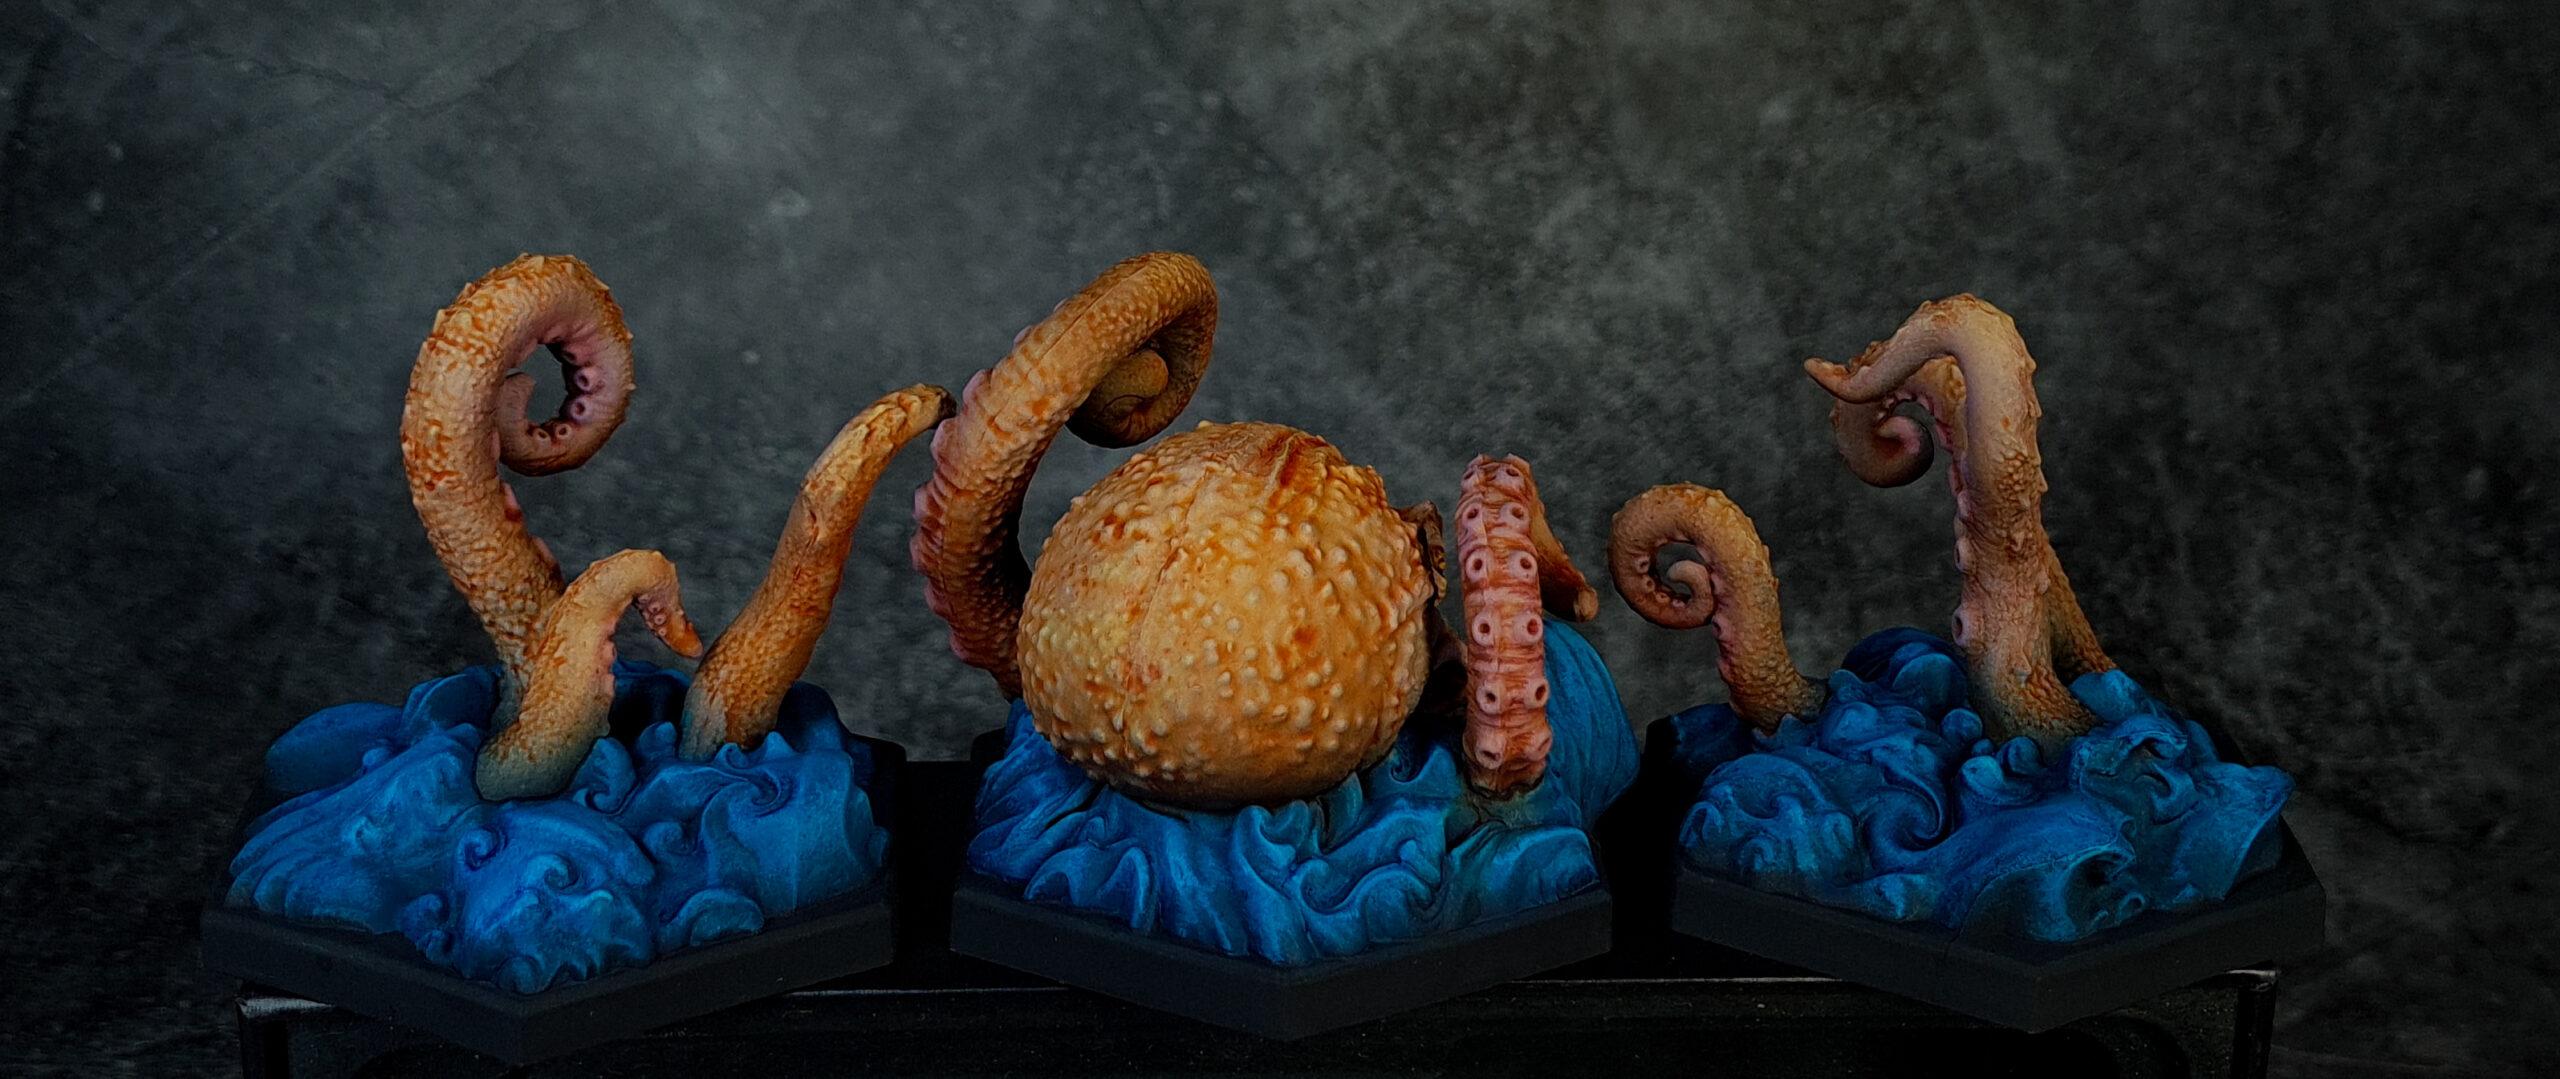
Picture by Marco Troschka

